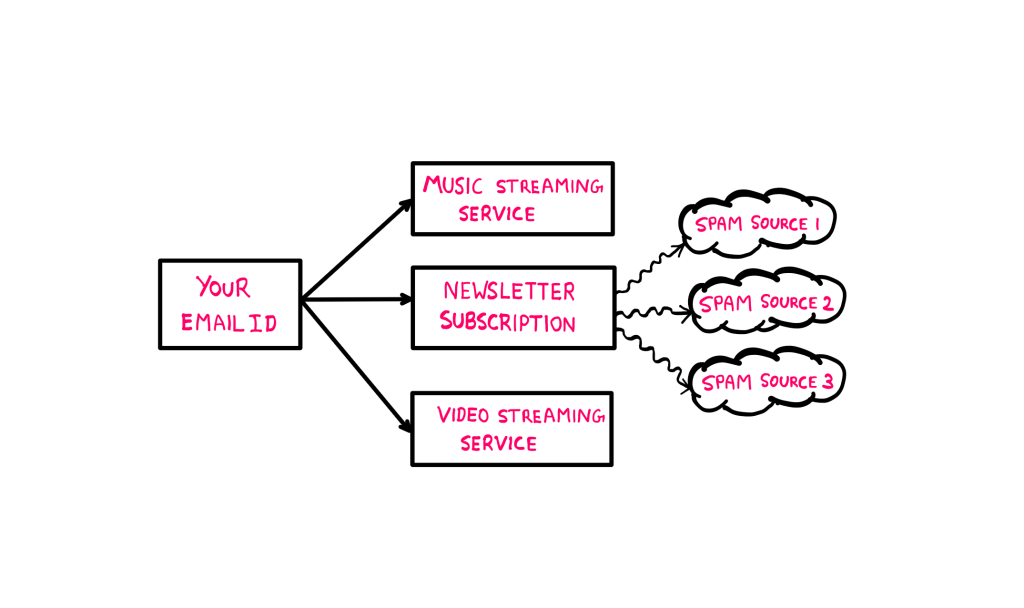
Why would you wish to figure out who is leaking your email ID? Well, let us say that you use your email address to sign up for a bunch of online services. All of a sudden, you start receiving spam emails from unrecognised sources.
The email account that you carefully maintained all this while is now the camping ground for African princes and billionaires who generously wish to share their wealth with you. For starters, don’t you wish to figure out who the culprit that leaked your email ID was?
I was faced with the same situation. And I just had to look for a solution. The solution that I came across not only helped me figure out who the culprit was, but it also enabled me to completely neutralise all further spamming attempts.
I will begin this essay by giving you a step-by-step breakdown of the procedure that I followed (it is surprisingly easy and simple). Following this, I will explain the ingenious email technology behind this solution. Without any further ado, let us begin.
Let us say that you wish to sign up for a random online service using your email ID. The first thing you need to do is share a plus address from your email service provider instead of your original one. Let me explain.
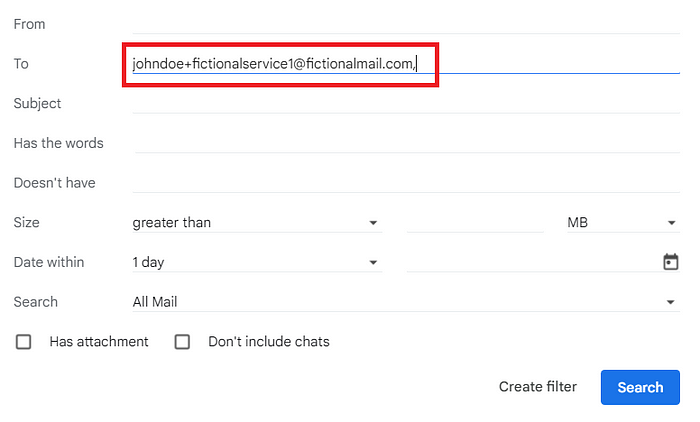
And further, suppose that you wish to sign up for a music streaming service called FictionalStream.net. In their sign-up form, provide the following email ID (as an example):
Don’t worry. You will still receive all emails from this service provider in the inbox associated with your original email ID (JohnDoe@FictionalMail.com).
The string after the plus (+) symbol is not considered part of your email address, but rather a label (more on this later).
You can use the same logic to sign up for other services as follows:
This way, each service provider gets a unique instance of your email address. But you get all of their emails in your inbox. Now that we have taken care of that, let us see how we can leverage this labelling system to track the culprit down.
Set Up Filters and Actions Based on Labels
Depending upon the email service provider you use, you might need to manually set up labelling. In simple terms, you tell your email client to do the following:
If an incoming email has the following ‘To’ address: “[email protected]”, label it as follows: “Fictional Service 1”.
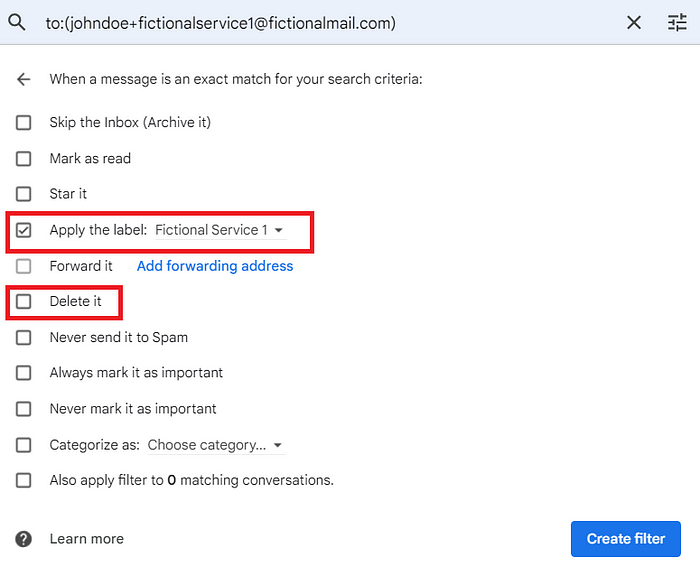
Then, you can leverage these labels by setting up automated filters and/or actions upon email arrival. For example, you can tell your email client to automatically move emails with particular labels to specific folders, or delete them, etc.
This is what we will be using to not only figure out who the culprit is, but also take automated action to neutralise further spamming attempts.
How to Figure Out Who is Leaking Your Email ID
Now that we have our labelling system working, as soon as you start receiving spam emails, you will notice the label of its original source. That is, you will directly see which culprit leaked your email ID.
You might now think that you could just unsubscribe from this service and that would fix the issue. But the challenge is that we do not know just how many spam sources this service provider leaked your Email ID to.
So, even if you unsubscribe from the questionable service provider, you might still continue receiving spam emails. To counter this issue, we are just going to leverage the filter/action system we set up earlier.
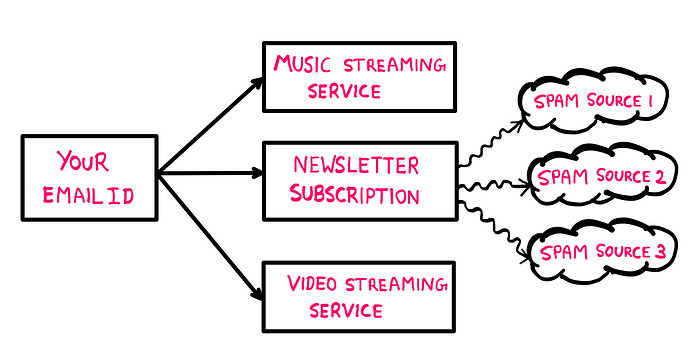
Email Leaks — Illustrative art created by the author
You can tell your email client to automatically move further emails associated with the ‘culprit’ label to your spam folder or even to delete it automatically.
Example of automated email filter plus action — Courtesy: Gmail
There you go. Not only do you neutralise spam email attempts this way, but you need not manually unsubscribe or recover your email address from each source.
Now that I have covered the procedure that I followed, let me get into the basic technical details of how this solution works.
Subaddressing — The Basics
Technically, the concept powering this solution is known as ‘subaddressing’ or more colloquially, ‘plus addressing’. Simple Mail Transfer Protocol (SMTP) email addresses use the following email ID syntax:
<local-part>@<domain>
When you use subaddressing/plus addressing to label your email subscriptions, you use the following syntax:
<local-part>+<tag>@<domain>
the ‘+<tag>’ part refers to the custom label that you choose for each service provider. As far as I could check, many popular email service providers (all the ones that I use) offer this functionality. So, for most mainstream applications, this solution should work well.
On that note, we do need to consider some restrictions when we use this technology.
How to Figure Out Who is Leaking Your Email ID — The Restrictions
The ‘+<tag>’ part that you choose is subject to the regular character restrictions that SMTP email address are bound to. For example, you are not allowed to use spaces.
Furthermore, some online service providers use forms that do not recognise the plus (+) symbol. So, this solution might not work with them.
Another limitation that I came across is when you have to manually send an email from your email ID to a service provider in order to unsubscribe.
In such a scenario, your ‘from’ address will be your default email address (for example: [email protected]) and not the one you used to register for the service (for example: [email protected]).
Your service provider might refuse to accept/acknowledge your ‘unsubscribe’ request due to this mismatch. I know that most services don’t operate this way (they use an ‘unsubscribe’ link), but in some cases this can be a pain. So, just be aware of that.
By now, I think I have covered almost every relevant aspect of this solution. So, I’ll just round things up by summarising the steps once again and sharing a bonus use case for this technology.
How to Figure Out Who is Leaking Your Email ID — Summary
Here is a step-by-step breakdown of what we have covered thus far:
Step 1: Subscribe to/register with each online service provider using a plus address: <local-part>+<tag>@<domain>. Choose the ‘+<tag>’ part uniquely for each service.
Step 2: Label incoming emails with the plus-registered ‘To’ address using a unique identifier in your email client (such as FictionalService1).
Step 3: Notice which label each spam email carries — this label leads to the culprit.
Step 4: Set up automated filters/actions based on the label in question. For example, you can automatically route such emails to a spam folder.
More Functionality for Better Organisation
Asa bonus use case, you can employ this technology to organise your email connections better. For instance, instead of handing out separate email IDs to friends and family members, you could hand out the following email IDs for each case:
As you can imagine, you can extend this concept to business email addresses as well. For example, you can have a separate tag for ‘Billing’, ‘CustomerSupport’, etc. I’ll let you work out further creative possibilities on your own.
I came across this cool technology when I was trying to solve my own problem. In the process of solving my problem, I learnt so much about the technology that I thought I’d write about it.
I hope you found my essay useful. Furthermore, I wish you fun and success in organising and tracking your email sources using this technology.
*All email addresses that I have used in this essay are fictional by intention. Any resemblances to real-world email IDs are purely coincidental and not intended.
We use cookies on our website to give you the most relevant experience by remembering your preferences and repeat visits. By clicking “Accept”, you consent to the use of ALL the cookies.
This website uses cookies to improve your experience while you navigate through the website. Out of these, the cookies that are categorized as necessary are stored on your browser as they are essential for the working of basic functionalities of the website. We also use third-party cookies that help us analyze and understand how you use this website. These cookies will be stored in your browser only with your consent. You also have the option to opt-out of these cookies. But opting out of some of these cookies may affect your browsing experience.
Necessary cookies are absolutely essential for the website to function properly. These cookies ensure basic functionalities and security features of the website, anonymously.
Cookie
Duration
Description
cookielawinfo-checkbox-advertisement
1 year
Set by the GDPR Cookie Consent plugin, this cookie is used to record the user consent for the cookies in the "Advertisement" category .
cookielawinfo-checkbox-analytics
11 months
This cookie is set by GDPR Cookie Consent plugin. The cookie is used to store the user consent for the cookies in the category "Analytics".
cookielawinfo-checkbox-functional
11 months
The cookie is set by GDPR cookie consent to record the user consent for the cookies in the category "Functional".
cookielawinfo-checkbox-necessary
11 months
This cookie is set by GDPR Cookie Consent plugin. The cookies is used to store the user consent for the cookies in the category "Necessary".
cookielawinfo-checkbox-others
11 months
This cookie is set by GDPR Cookie Consent plugin. The cookie is used to store the user consent for the cookies in the category "Other.
cookielawinfo-checkbox-performance
11 months
This cookie is set by GDPR Cookie Consent plugin. The cookie is used to store the user consent for the cookies in the category "Performance".
CookieLawInfoConsent
1 year
Records the default button state of the corresponding category & the status of CCPA. It works only in coordination with the primary cookie.
viewed_cookie_policy
11 months
The cookie is set by the GDPR Cookie Consent plugin and is used to store whether or not user has consented to the use of cookies. It does not store any personal data.
Functional cookies help to perform certain functionalities like sharing the content of the website on social media platforms, collect feedbacks, and other third-party features.
Performance cookies are used to understand and analyze the key performance indexes of the website which helps in delivering a better user experience for the visitors.
Cookie
Duration
Description
_gat
1 minute
This cookie is installed by Google Universal Analytics to restrain request rate and thus limit the collection of data on high traffic sites.
Analytical cookies are used to understand how visitors interact with the website. These cookies help provide information on metrics the number of visitors, bounce rate, traffic source, etc.
Cookie
Duration
Description
__gads
1 year 24 days
The __gads cookie, set by Google, is stored under DoubleClick domain and tracks the number of times users see an advert, measures the success of the campaign and calculates its revenue. This cookie can only be read from the domain they are set on and will not track any data while browsing through other sites.
_ga
2 years
The _ga cookie, installed by Google Analytics, calculates visitor, session and campaign data and also keeps track of site usage for the site's analytics report. The cookie stores information anonymously and assigns a randomly generated number to recognize unique visitors.
_ga_R5WSNS3HKS
2 years
This cookie is installed by Google Analytics.
_gat_gtag_UA_131795354_1
1 minute
Set by Google to distinguish users.
_gid
1 day
Installed by Google Analytics, _gid cookie stores information on how visitors use a website, while also creating an analytics report of the website's performance. Some of the data that are collected include the number of visitors, their source, and the pages they visit anonymously.
CONSENT
2 years
YouTube sets this cookie via embedded youtube-videos and registers anonymous statistical data.
Advertisement cookies are used to provide visitors with relevant ads and marketing campaigns. These cookies track visitors across websites and collect information to provide customized ads.
Cookie
Duration
Description
IDE
1 year 24 days
Google DoubleClick IDE cookies are used to store information about how the user uses the website to present them with relevant ads and according to the user profile.
test_cookie
15 minutes
The test_cookie is set by doubleclick.net and is used to determine if the user's browser supports cookies.
VISITOR_INFO1_LIVE
5 months 27 days
A cookie set by YouTube to measure bandwidth that determines whether the user gets the new or old player interface.
YSC
session
YSC cookie is set by Youtube and is used to track the views of embedded videos on Youtube pages.
yt-remote-connected-devices
never
YouTube sets this cookie to store the video preferences of the user using embedded YouTube video.
yt-remote-device-id
never
YouTube sets this cookie to store the video preferences of the user using embedded YouTube video.

Comments